Two-at-time-socks on a Magic Loop: The Heel, Part 1

I have had great intentions to blog in the past week, but work and other committments have prevented this 🙁 On a positive note, things are going extremely well at work, 🙂 , and I have managed to get the second part of the Two-at-a-time Sock Tutorial out. Because there are simply too many photos, I am dividing the Heel Instructions into two posts…this post will deal with the first half of short rows, and the next post, the second half of the heel.
A note about Heels…
There are as many different approaches to knitting heels as there are knitting stitches…and if you Google “sock heels”, you’ll find a myriad of names, like, short-row, gusset, afterthought, peasant etc etc… don’t be put off by terminology…just find the heel that works best for you, and from there you can experiment without worrying about the outcome!…after all you know that you can always go back to the heel that works 🙂
I prefer a short-row type heel…I like that is resembles a commercial sock heel in neatness and elegance. There are , again, many different ways to knit a short-row style heel, and the biggest problem you’ll find discussed when socks are mentioned, is how to prevent holes forming at the junction between the two triangle halves of the heel. This is the Holy Grail of sock knitting and over the aeons, clever knitters have devised lots of ways to minimize/eliminate these little holes. The heel I am doing the tutorial on, is known by many names, but for brevity’s sake, I am going to use the name Double Stitches Heel.

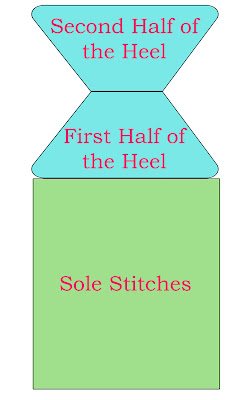
Let’s take a quick look at the basic sock heel…above you can see a simple schematic on what the heel is made up of…two triangles on top of each other. Although not illustrated in the diagram, the sides of the triangles are joined, forming a pita-like little triangular “pocket” that your heel fits into. Above you see that the triangles of the two halves of the heel are made up of ever decreasing rows of knitting for the first half and then ever increasing rows of knitting in the second half of the heel. Strictly speaking, the first series of rows are the “short rows”, ie you are not knitting every stitch of every row, but are leaving an extra stitch unknitted on each row, forming the triangular shape. In the second half of the heel triangle, you start knitting/purling an extra stitch of knitting on each row (I guess they should more accurately be called ” long rows” 😉 ), until you have knitted the full complement of stitches that you started the heel with (in the tutorial sock’s case = 32 sts for each sock).

Right, how do you know how many stitches to “leave unknitted” on each side of the heel triangle? Generally, you divide your number of heel stitches into thirds, so, in the case of a 64sts sock, you will have 32 sts for the heel , divided into thirds, so 10sts/12sts/10sts, or perhaps 12sts/10sts/12sts. It may not make sense now, but just follow along, read through all of this post and the next to follow and it will become clear 🙂
A couple of points to remember:
1. When you knit Two-at-a-Time socks on a Magic Loop, and you are ready to start the heels, you will work ONLY on the right sock heel , until it is completely finished (knitting, turning your work, purling, turning your work etc basically knitting back and forth as if you were knitting on straights), then you move along to the left sock, complete the heel , then you start knitting in the Magic Loop fashion again, going around and around as you continue to knit the leg section of the socks, up to the cuffs.
2. The Heel is the only section of these socks that you are knitting AND purling . These socks are simple stocking stitch socks, so the heel is the only bit that has purling (because you are knitting back and forth), but obviously, if you make patterned socks , your pattern will dictate if there are purl stitches in other sections of the socks.
3. While you work the heel on one sock, you completely ignore the other sock, just make sure that you don’t inadvertently “undo” the Magic Loop 🙂
Right! ….ready to go?
 Your work should look like the photo above…I have knitted round after round on the Magic Loop, until my sock measured about an inch shorter than my foot length. We will start on the Right Sock, ignoring the Left Sock until the Right Sock heel is completed.
 The Sole side of the Right Sock is facing you.
 Above is a close-up of the Right Sock Sole…notice that the working yarn is coming off of the back needle. Pull out the back needle…you will knit with this…it becomes the Right Hand Needle (RHN).
 Knit right across all the Sole stitches.
 Because you are working back and forth as if you were knitting on straight needles, there is no pulling out of the other needle… you are simply turning your work around and purling back to the other side…OK…let’s look at what a Double Stitch (DS) is… Take note of the first stitch on your needle in the photo above. When the working yarn is held pulled down, you see an ordinary “Purl” stitch.

 However…if you pull the working yarn upwards, you see that the “purl” stitch suddenly has two legs. These two legs represent a Double Stitch (DS)…don’t be thrown by the terminology…IT IS STILL ONE STITCH… and you will count this as ONE stitch…just remember the two legs are like twins…never separated! The pulling up of the working yarn simply tightens the stitch, making it less likely to leave a “hole” in the side of your sock, when you knit the DS later on.
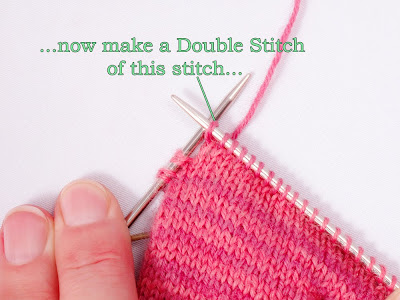
Ok, pull the working yarn down to it’s usual position, and let’s make a Double Stitch…
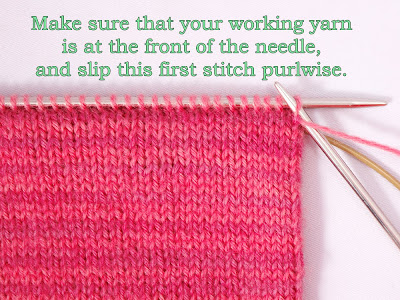
 Slip this first stitch “purlwise”, onto your RHN.

 Now pull your working yarn up and over the RHN, seeing the two legs appear…
 …bring your working yarn between the needle tips and tug gently downward, so that the working yarn is now in the correct position to start purling the rest of the stitches.

 Above you can see that the working yarn is placed correctly for regular purling, and on the RHN, you now have a two legged Double Stitch!
 Purl all the way across the rest of the stitches.
 Because you have purled across the heel stitches, you have the instep stitches facing you, and the heel stitches hiding behind…turn your work around…note that the Double Stitch on the far right looks just like two regular stitches, but if you look closely, you’ll see that the DS is different on the other side, like two sets of arms, with the little hands clasped together.
 Right! Next you are going to make a Double Stitch on the knit side of the Heel stitches. Again, even though the “knit side of the heel is facing you, you are still going to slip the first stitch “purlwise”…make sure that the working yarn lies in front of (ie closer to you), the RHN, before slipping the stitch.


Now pull your working yarn up and slightly to the left of the RHN, and you’ll see the Double Stitch formed as you pull the yarn…don’t be worried,…this Double Stitch does look a bit different to the previous one, as these two legs are twisted around each other 🙂 That’s how is should be!

 The act of pulling the working yarn to the position behind the RHN, will automatically place it in the correct position to knit the next stitch…just a normal knit stitch.

 Now knit all the way across the heel stitches, until you have knitted the last stitch JUST BEFORE the previously made DS. Your work should look like the photo above.
 Turn your work around. Take note that the Instep stitches are facing you again…and the Previously made DS is on your RHN.
 You will make a Double Stitch out of the next along stitch, in exactly the same way as before….
 Pull the working yarn over the RHN…see the two legs of the DS appear…
 …bring the working yarn between the needles, to the front of the work…purl all the way across the heel stitches until you have purled the last stitch before the previously made DS…
 Above, you can see the previously made DS, and that the last stitch before it has been purled…now turn your work around again.
 In the same way as you did before, you will make a Double Stitch out of the next along stitch…
 Pull the working yarn up and over the RHN, making the DS…you will now have TWO Double Stitches on your RHN.
 Knit all the way across the heel stitches until you have knitted the last stitch before the DS…
 Note that you already have two DS on your LHN…turn your work, and continue making DS at the end of each row of knitting/purling, until you have TEN Double Stitches on each side, and you have the Heel stitches facing you. You should have 12 plain (non Double Stitches), in the middle of your work.
 Ok! Well done, you are nearly half way with the Heel 🙂 Continue to knit across the Heel stitches. This means that you are actually knitting the previously made Double Stitches (yes, all 10 of them!), right to the end of the row…make sure that you have knitted through BOTH legs of each DS…see the photo below …


Above you can see that all of the DS are knitted and you’ve reached the end of the row…note that you still have DS’s on the right hand side of your work!
 …now turn your work around, slip the first stitch purlwise (BUT this time DON’T make a Double Stitch), and purl all the way across…again, making sure that you catch both legs of each DS as you purl…
 Make sure that you catch both legs of the DS as you purl across…
 Your work should now look like the photo above…the first part of the Heel is already making a little outpouching… 🙂
 Turn your work around and flatten the little Heel outpouching towards the toe…you are ready to start the second half of the heel… 🙂
I have been really busy at work, so I am sorry that this is only now getting posted…I hope to have some time, and have the second half of the heel posted by the weekend 🙂
*Update: Here is the link to Part 2 of the Heel Tutorial*
Happy Knitting!
♥Heidi


